 RapidRAW
Turning a Parked Car Into a Panning Shot
How RapidRAW's new Motion Blur works, step by step: an inverted car mask, spinning wheels and depth for a realistic panning shot.

A good panning shot is hard to take. You follow a moving car with the camera, use a slow shutter speed, and hope that the car stays sharp while the background turns into streaks. Most of the time, you get a blurry car or a background that hardly moves.
The car in the header wasn't moving at all: on the left is the original photo. It was parked on a gravel road in an autumn valley. Everything you see moving was added in RapidRAW, with the new Motion Blur in v1.6.8.
In this post I'll show the three steps that made this photo, and what RapidRAW does behind each of them.
Step 1: Blur everything except the car
In a real panning shot, the camera moves with the car. So the car stays sharp, and everything around it streaks in the direction of travel.
That's a job for a mask. I added an AI mask on the car and inverted it, so it covers everything except the car. In the mask's Motion Blur, I picked Linear, a straight streak along the direction the car is driving.

Here is the first tricky part. If you simply blur the background, the white car gets blurred into it too. You'd get a pale smear around the car, because the blur pulls in pixels from the car itself.
RapidRAW avoids this. With Motion on Auto, it sees that the mask covers most of the image border and switches to Panning. In that mode it first fills the area behind the car with colors from the surroundings, using a pull-push fill: the background is averaged down into smaller and smaller levels, then pushed back up to fill the hole smoothly. Only then is the background blurred. The streaks pass behind the car without picking up any of its white.
Step 2: Turn on Depth
At this point the photo already looks moving, but something is off. Every part of the background moves at the same speed: the gravel right in front of the car streaks exactly as much as the mountains far away.
That's not how it works when you look out of a moving car. Things close to you rush past, things far away barely move. So I turned on Depth in the Motion Blur settings, with an Amount of 54.

With Depth on, RapidRAW uses an AI depth map of the photo and scales the length of the blur for every pixel. The car is the reference: things at the same distance keep the normal streak length, things closer to the camera streak more (up to four times as long), and things further away streak less.
The 3D view in the panel shows what the AI thinks the scene looks like: the road in front, the car on it, and the valley and mountains behind. If something looks wrong there, it will look wrong in the blur too, so it's worth a quick look.
This one switch is what makes the shot believable. The gravel in front of the car now flies past, while the valley behind it drifts more slowly, just like a real panning shot from a car driving alongside.
Step 3: Spin the wheels
There's one thing left that gives the trick away: the wheels. On a moving car, the wheels spin, and their spokes turn into a soft blur. Here they were still perfectly sharp.
So I added a Radial mask on each wheel and set its Motion Blur to Spin.
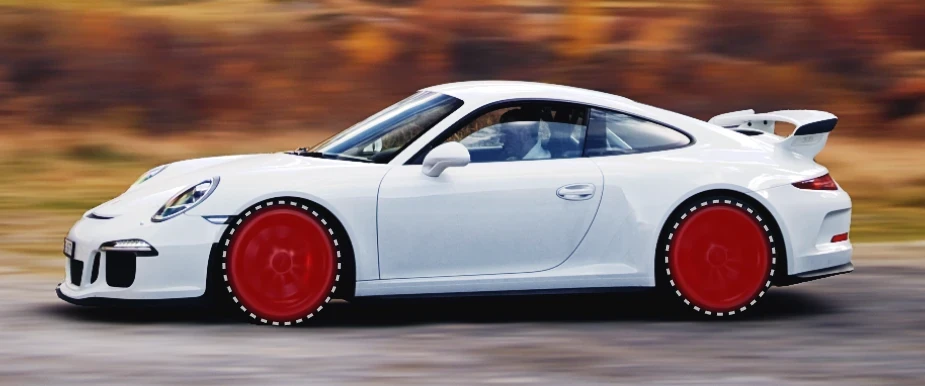
Spin turns each masked area around its own center. RapidRAW finds the separate areas in a mask, so one mask with two wheels would work too, and each wheel spins on its own. It also fits an ellipse to each area. Wheels seen slightly from the side are ovals, not circles, and the blur follows that oval instead of a perfect circle.
That's it: one inverted mask, Depth, and two small masks on the wheels.
What happens under the hood
A few details make the blur look like a photo instead of a filter.
Streaks that fade out. A real long exposure doesn't start and stop with a hard edge. RapidRAW builds each streak from two blurs, one with 70% and one with 30% of the length, so the streak is strongest in the middle and fades out at both ends. Linear blur also gets a tiny bit of blur across the motion, which keeps the streaks from looking too perfect.
Fast, even for long streaks. A streak that is 1000 pixels long would normally need a lot of samples for every pixel. Instead, RapidRAW blurs in steps of 8 samples, where every step makes the blur 8 times longer. Four quick steps are enough for a 1000 pixel streak.
Light trails. Bright lights are boosted before blurring and brought back after. So a street lamp or a headlight turns into a bright trail instead of a dull grey smear. The Highlights slider controls how strong this is.
Grain that matches. Blurring removes the noise of the photo, and a perfectly clean area in a slightly noisy photo looks fake. So RapidRAW measures how noisy your photo is and adds the same amount of noise back into the blurred areas.
It runs in linear light. Like a real exposure, the blur is calculated on the light itself, before your other adjustments. So exposure, color and tone edits apply to the blurred photo as a whole.
Not just cars
Motion Blur has four types: Linear, Zoom, Spin and Smooth. Zoom is great for a "zoom burst", where everything rushes toward the center, like zooming the lens during the exposure.
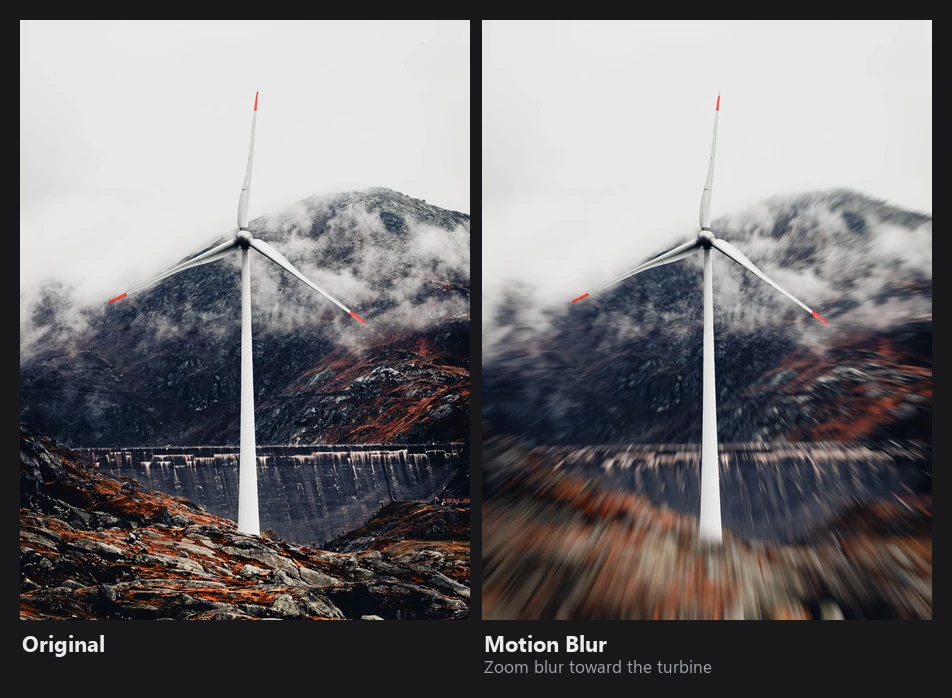
You can use it on the whole photo, on a subject, or only on the background, and combine as many masks as you like, like the wheels above.
Try it
Motion Blur is in RapidRAW v1.6.8. You'll find it in the Effects panel, and inside every mask. All settings, the four types and more starting points are in the docs: Motion Blur. If you want the full details of how it's computed, see the technical reference.
If you make something cool with it, I'd love to see it on Discord.